Chocolate Chocolate Chip Cookies Recipe

I scanned the internet for a good double chocolate chip cookie recipe, and found one that I tweaked a bit – they came out fabulous! Of course, it’s hard to mess up basic chocolate chip cookies, but you don’t want to take serious risks with CHOCOLATE! 😉

Chocolate Chocolate Chip Cookies - photo © Kristen N. Fox

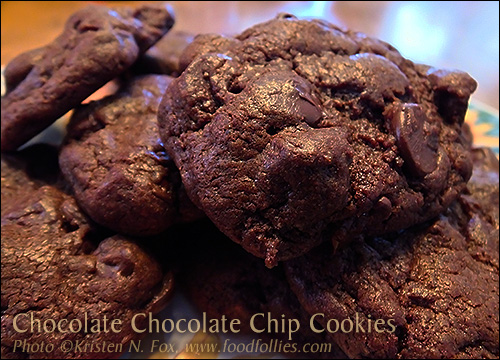
They were gooey when they came out of the oven but after waiting for them to cool down before removing them to the cooling rack, they stiffened up nicely, and then remained chewy for as long as they lasted. I think my swapping out some of the white sugar for brown sugar helped. Also, feel free to use a little less sugar if you like – reviews of the original recipe seemed to indicate that the amount can be flexible according to taste.

Here’s the final recipe I ended up with:

Chocolate Chocolate Chip Cookies

1 cup butter
1 cup white sugar
1 cup brown sugar (not packed)
2 large eggs
2 teaspoons vanilla
2 cups flour
3/4 cup cocoa
1 teaspoon baking soda
1/2 teaspoon salt
12 oz. bag of chocolate chips

Cream together butter and the sugars. Then add in eggs and vanilla, mixing well.

Blend in cocoa, and then baking soda and salt.

Mix in flour.

Fold in chocolate chips.

From dough, make balls about the size of a rounded teaspoon, place 1.5 inches apart on ungreased cookie sheet. Slightly flatten each ball.

Bake at 350F for 8-9 minutes. Cookies will be gooey when you pull them out of the oven – let them sit in the cookie sheet for at least five minutes before using spatula to remove them to the cooling rack.

Using the New Bread Pan

I finally had a chance to use the new bread pan John got me over the holidays! It’s for French/Italian type loaves, and, at least in my case, it REALLY helps them keep their shape instead of spreading out too much and going too flat during the second rising.

The pan is about a foot and a half long, so the loaves you’re seeing are a bit on the small side (as compared to, say, Italian bread you’d see in the grocery store), but that worked well for us as we ate one and put the other one in the freezer.

This pan is a Chicago Commerical II pan, and it did a GREAT job – loaves were much rounder and ‘normal’ shape and the holes let the underside get baked properly as well – I’d definitely recommend this pan!  🙂

GuS – Grown-up Soda – Extra Dry Ginger Ale

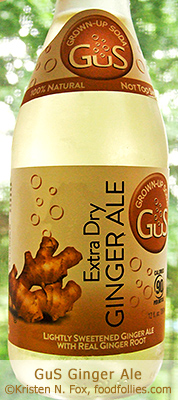
For a number of years now, John and I have been buying only soda with sugar, and not high-fructose corn syrup. We might each have, at most, one or two a week, but we often end up splitting one, sometimes doing a half and half with a can of seltzer. We like to think it’s because our tastes have, *ahem*, “matured” over the years, but even a whole soda is sometimes too much sugar when you just want a bit of fizzy sweetness.

[Note: I did just find Sierra Mist in the store in little 7 oz. cans, which is also made with sugar instead of HFCS, so it looks like we’re not the only ones thinking this way!]

Another habit we’d picked up in restaurants is making/requesting a glass of seltzer with just a wee bit of a lemon-line soda to sweeten it up a little.

If you’re a die-hard, regular 2-liter soda, full everything, drinking fan, you’re probably shuddering as you read this. LOOK AWAY NOW!!!!

Recently I ran across GUS – Grown Up Soda – a not-inexpensive 4-pack in the grocery store specialty drink section. It’s a 12 oz. bottle of soda, and it’s made with about half the sugar (not HFCS) of a regular 12 oz. soda, and is flavored with real ingredients! The ginger ale is made with real ginger and has a hint of ginger-hotness without being overwhelming, and the cola is made with real cola nut! (Haven’t tried the pomegranite yet – that’s next.) But… seriously…. real cola nut!  The last cola we knew of that actually had cola in it was Blue Sky Cola, and we haven’t seen that in years now. Oh, and no caffeine.

GuS’s are exactly as advertised – “not too sweet”, and they have terrific refined flavor and excellent fizz. It really is a grown-up soda! We highly recommend trying these if you’re looking for the less-sweet, still tasty alternative without going the way of artificial sweeteners.

(And if you’re a fan of the tv show Psych, there’s the added bonus of always trying to think up funny replacement names for the brand. If you don’t know what I mean, go watch a few episodes – LOL. )

Homemade Ravioli

I was eyeing the container of ricotta cheese in the refrigerator the other day and had the impulse to make a batch of homemade ravioli. After creating the ravioli with the pasta machine and the ravioli form (click here for more details about the actual creation process from a previous post from a long time ago), I set them on a cookie sheet covered in wax paper, none of the ravioli touching, then put them in the freezer until frozen.

Homemade Ravioli ©Kristen N. Fox, www.foodfollies.com

With one batch of pasta I was able to make enough for a few meals – tossed into plastic bags in the freezer. Homemade raviolis do VERY well in the freezer! 🙂

Mini French Bread Loaves

I think I’m getting better at this yeast-bread thing – bodes well for 2013! (Happy New Year!)

I made two mini french bread loaves and they rose and baked perfectly! Sure, I still need to work on ‘form’ but I can’t wait to cut a slice, just for sampling purposes, of course.

Happy Birthday Cake, John!

In honor of John’s birthday, we had cake for breakfast! *grin*

yellow cake with chocolate buttercream frosting

This is a homemade yellow layer cake with chocolate buttercream frosting. It’s not the neatest decorating job, but at least now I know what a cookie gun can do well, and can’t, in terms of frosting. (Next time I will use an icing bag to manually control the flow of frosting better. Notice how I blamed the tool instead of the user – hah!) Still it tastes really good, which is the most important part!

Below is the recipe for both the yellow cake and the chocolate buttercream frosting, although I switched out some fo the all-purpose flour for some cake flour to give it a slightly finer texture.

Happy Birthday, John!

Yellow Cake with Chocolate Buttercream Frosting

Yellow Cake Recipe

2 1/4 cups flour
1 1/2 cups sugar
3 1/2 teaspoons baking powder
1 teaspoon salt
1 1/4 cups milk
4 tablespoons vegetable oil
1 stick softened butter
1 tablespoon vanilla
3 large eggs

Combine flour, sugar, baking powder, and salt in a large bowl. Mix in milk, oil, and softened (not melted) butter, and vanilla. Mix in three eggs and stir until well combined and as smooth as possible.

Preheat oven to 350 degrees. Oil 2 or 3 9-inch round pans for layers. Bake 20-25 minutes, 20 minutes for three pans, 25 for two, although each oven is different. If toothpick comes out clean, you’re done. Cool on baking rack before turning out of pan.

Chocolate Buttercream Recipe

(This recipe will cover a two layer cake, and MAYBE three if you stretch it. However, you can always make another ‘half’ batch of frosting so you’re not skimping.)

1/2 cup soft (not melted, but very soft) butter
2 1/4 cups powdered sugar
1/2 cups cocoa
1/4 teaspoon vanilla
1/4 cup milk

In medium bowl, sift sugar and cocoa together to get rid of any clumps. (Can also toss them into the food processor together for a few very short bursts.) Set aside.

In large bowl, mix butter and vanilla together. Add sugar and cocoa mixture. Then add milk and stir until smooth. If too thick add a teaspoon of milk at a time until desired consistency. If too runny, add a touch more powdered sugar until desired consistency.

Frost yellow cake layers when completely cooled.

Farmhouse White Bread

I tried another recipe from my friend Barbara Mack’s book, Easy, Fabulous Bread Making: A collection of quick, no-knead, homemade bread recipes – just a basic white bread – and it came out just perfect!

Farmhouse White Bread ©Kristen N. Fox, foodfollies.com

I didn’t actually have the patience to let it sit overnight in the refrigerator, as per directions, so I let it rise in a pretty cold kitchen for a while, then punched it down and let it rise in the glass pan and then baked it.

It made the most delicious peanut butter and jelly sandwich I’ve ever had! Absolutely nothing like homemade!

Ingredient Lists on Wine Labels

I just ran across this article about a small winemaker who is putting an ingredient list on his wine labels. After reading the article, I learned a lot and applaud his decision and integrity, and am now going to be looking suspiciously at every bottle I buy – DOH! Anyway, maybe this will start catching on more, at least among smaller artisan wineries. Click here to read about Ingredient Lists on Wines.

Raisin Bran Muffins

Yup, I whipped up some muffins made from raisin bran cereal, of which we had much, and of the mostly stale variety!  I love finding a new use for things I’d otherwise have to throw away, and as often as we found ourselves with a partial box of stale raisin bran sitting around (shall have to investigate that), I just never got around to making these before.

Raisin Bran Muffins - ©Kristen N. Fox, www.foodfollies.com

I took the basic recipe from the web and then tweaked it a little to add a bit more flavor and pizzazz – raisin bran muffins just SCREAM pizzazz, don’t they. ;)  Here’s the recipe …

Raisin Bran Muffins

1 1/4 cups all-purpose flour
3 tsp. baking powder
1/2 tsp. salt
1/2 cup sugar
1/4-1/2 tsp. cinnamon
3 cups raisin bran cereal
1 1/4 cups milk
1 egg
1/3 cup vegetable oil

(also need some crumbled bran flakes and sugar for topping)

Mix the first five (dry) ingredients together in a medium sized bowl and set aside.

In a large mixing bowl, mix cereal with milk, and let set for a few minutes to soften the cereal. Add the egg and vegetable oil and stir until blended.

Add the flour mixture to the cereal mixture, stirring only until ingredients are blended well.

Either use cooking spray in a muffin tin or line the muffin tin with paper muffin liners. Then divide the batter between all twelve muffin spots – they will be pretty full.

Before putting the muffins in the oven, sprinkle a little bit of crumbled bran flakes and then sprinkle a little sugar over each muffin, for a crunchy topping.

Bake at 400F for 25 minutes. Cool on wire rack.  (recipe from foodfollies.com)

Banana Pancakes

I know these LOOK like regular, ordinary pancakes…

Banana Pancakes

But they are really BANANA PANCAKES! Didn’t see THAT one coming, did you!  Did you!!?? Did…. never mind.  Anyway, they were delicious. We even had a special tiny pancake left over for the dog, who also approved.

Here is our recipe, adapted from a basic one we found on the web.

Banana Pancakes

2 1/2 cups Bisquick
2 cups milk
2 eggs
1 cup mashed bananas
1/2 teaspoon cinnamon
1 teaspoon vanilla
1 teaspoon sugar
1/4 c. wheat germ/ground flax (optional)

Beat ingredients until well blended. For thinner pancakes add more milk, a little at a time, as needed. Pour by 1/4 cupfuls onto hot griddle – we recommend greasing the griddle beforehand. Cook until edges are dry. Then flip and cook until golden. Yields 12-13 pancakes, depending on size, etc.